****** If you brick your phone it’s not my fault and I can’t help you!!!
…just needs to be said. 🙂 ******
Special thanks to all the people who’s sites I used to get this put together!
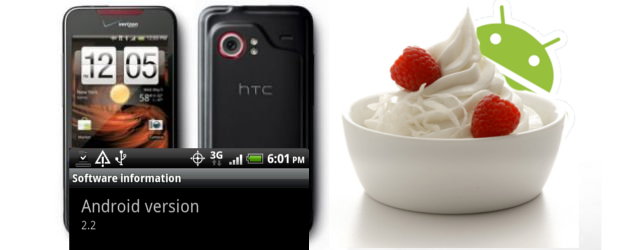
All I have to say is, “WOW! Android 2.2 (Froyo) with Flash 10.1 on the HTC Droid Incredible is now truly INCREDIBLE!” I could go on, but I’ll just let you get started and you’ll find out all the cool stuff about it soon enough!
Final setup consists of the following:
- Sky Raider 2.5.2 with Flash 10.1 and HTC’s Sense UI
- Titanium Backup with BusyBox
So August 18th came and went and I, just like thousands of others, was disappointed that there was no Android 2.2 (Froyo) love for the HTC Droid Incredible! I was holding out since I didn’t really want to root my phone if an official update was available (I had never rooted an Android phone before…but that wasn’t going to stop me ;)). However, since HTC had recently released the source code for Froyo for the HTC EVO 4G and the Droid Incredible I figured that by now someone should have something cooked up from it for the Incredible. So, I started digging and I found everything I needed to get a pretty bug free version of Froyo with Flash 10.1 up and running on my Droid Incredible. Here’s a brief overview of what I needed to do in order to get it all setup (with links to where I got my info):
- Update the radio baseband (info here and here)
- Root my phone using unrevoked3 (info here)
- Do a nandroid backup
- Unlock NAND using unrevoked forever (info here and here)
- Install backup software (Titanium Backup (please donate) and BusyBox)
- Backup everything up
- Wipe everything
- Install Sky Raider 2.5.2 with Flash 10.1 and HTC’s Sense UI (info here)
- Restore apps/settings and extra stuff
Even though I did do some research before starting this, I did run into a couple quirks that took me a little extra time to figure out. Or, maybe I was just a little too anxious to get this done so I could enjoy it. 🙂 Anyway, I’ve tried to put together instructions that are pretty easy to follow and all in one place. Hopefully you can get your phone rooted and running Andorid 2.2 (Froyo), with Flash 10.1 in no time. I would recommend reading through everything first though, just to make sure you understand what’s going on. After I put this together I ran through it, using my phone, a couple times and it worked without any problems. Hopefully it goes well for you too! Enjoy!
How To Root Your HTC Droid Incredible
and Install Froyo (Android 2.2) and Flash 10.1
I ended up rooting and installing the new ROM, but had some minor problems along the way, mostly because I had never done it before. I learned a lot and after I had it up and running I ended up downgrading the phone back to the stock ROM and radio baseband so that I could run through it again and hopefully get it done the right way without any problems. I got it right the second time and the instructions are below. However, if you have already rooted and haven’t updated the radio baseband, I suggest you downgrade (see instructions below) and then run through these instructions from the top (backup everything first, of course :)). Starting from the stock ROM will help ensure that everything is OK.
Just as an FYI, in my “trial runs” of this process the data that was on my phone wasn’t modified or wiped until I got to the installation of the Sky Raider ROM and wiped it myself. Hopefully you have the same experience and don’t lose any data until after Titanium Backup is installed and you have backed everything up. OK, let’s get started:
Update Radio Baseband
These steps assume you have not rooted, or if you have rooted you downgraded back to the stock ROM (see below for instructions on how to downgrade). You need to make sure you’ve got the stock ROM to update the radio baseband, since I’ve read that if you try to apply the patch more than once you can brick your phone. If you’ve already rooted and have the correct radio baseband version then skip to the Use unrevoked3 to Root Your Phone section.
- Download the file dinc_ota.zip, rename it to update.zip and place it in the root of your SD card (Your SD card must be formatted FAT32/4096 bytes or the phone might not see the file).
- Reboot into HBOOT: Power down the phone and then press and hold power and volume down buttons.
- Once the HBOOT menu appears (it takes a few seconds once it shows up before you can do anything), press the volume down button once to select Recovery and then press the power button to select Recovery.
- You’ll get a screen with a red triangle and an exclamation mark. That’s OK. Go to the next step.
- Press the power button and the Volume Up button to bring up the recovery menu (it might take a few tries).
- Use the volume rocker to highlight “Apply sdcard:update.zip” and then press the power button to run it.
- Once it finishes (it takes several minutes), at the bottom of your screen you should see “Reboot via menu to complete installation.” A few seconds after the message appears you should get a menu at the top. “Reboot system now” should be highlighted so press the power button to reboot.
- It will take several minutes for it to reboot and apply the updates. You’ll see some green arrows while it’s updating. Once the Droid eye appears, just be patient, it will eventually finish.
- After it finishes booting, go to Settings > About phone > Software information > Baseband version and verify that it’s 2.05.00.06.11.
- Not it’s time to root your phone.
I want to say that I had a problem updating the radio the first time I tried from my factory stock phone. If you get a certificate error, then I suggest that you skip the radio update for now, root your phone, unlock NAND, backup everything, downgrade and then start it all again. Probably not what you wanted to hear, but it has worked for me.
Also, from what I’ve seen on posts you can’t run the OTA update on a rooted phone. I tried it and got the following error:
E:ignoring attempt to do multiple firmware updates
Not sure if this is bad or not, but I’d rather play it safe and get everything done without any errors. So, again, if you are rooted and haven’t updated the baseband radio you’ll need to back everything up and downgrade to the stock ROM and then update the radio.
NOTE: There’s a newer version of the Baseband Radio (2.15.00.07.28) that you can use. You can find it here. I actually ran through this whole process and installed Sky Raider 2.5.2 and then found this and updated the radio. However, you should be able to use this file in place of the one mentioned above. This one is a little easier since you just have to put it on the root of your SD card, boot into HBOOT, press the Volume Up key to apply the update, wait for it to finish and then press the Volume Up key to reboot. Worked like a charm for me.
Use unrevoked3 to Root Your Phone
This assumes that you are doing this from a PC running Windows. In my case I’m running Windows 7 so the driver installation instructions might be a little different if you’re running XP or Vista.
- To get started, go to unrevoked’s website, click on the picture of the HTC Droid Incredible, click on unrevoked3 and then click the link to Download for Windows. Save the files wherever you want.
- After you have downloaded reflash_package.exe, find it and double-click it. If prompted, click Yes to allow UAC to run the program.
- Select the destination where you want the files extracted (it doesn’t really matter where you put them, but you might want to create a folder named unrevoked3 and extract them to it).
- Once the files have been extracted, navigate to the folder that contains them.
- Download the unrEVOked modified USB driver and expand it somewhere you will remember.
- Turn on USB Debugging by going to Settings >Applications > Development and then check “USB debugging” (click OK to allow USB debugging when prompted).
- Turn off your phone and then boot into the HBOOT menu by holding power and volume down.
- Once you get to the HBOOT menu, connect the phone to your Windows PC with a USB cable and wait for the phone to say “HBOOT USB PLUG” on the screen (instead of just HBOOT).
- Open the device manager and you should see “Android 1.0” under “Other Devices”:
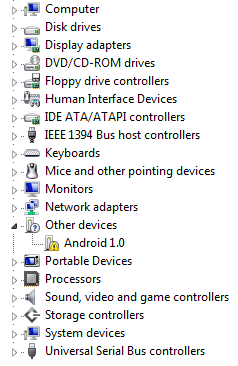
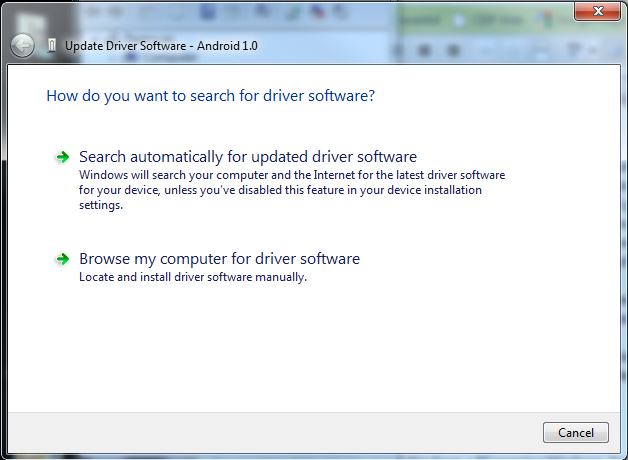
- Right click on “Android 1.0” and click “Update Driver Software”. You should then be at the following screen:
- Click “Browse my computer for driver software”.
- Click on “Browse” and select the Android USB driver folder on your computer where you extracted the drivers from step #5 above.
- Once you have selected the folder, click Next.
- You should see a progress bar and you might get a warning that it can’t verify the publisher. Click “Install this driver software anyway” and it should finish the install. Once completed you should see a screen like this:
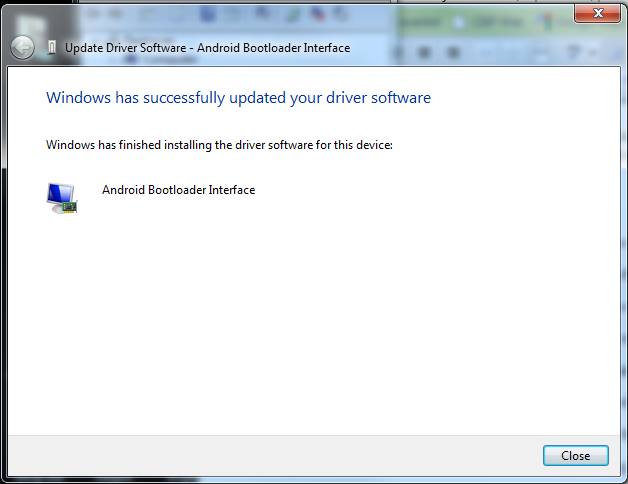
- Click “Close” and make sure “Android Bootloader Interface” is listed under “Android Phone” in the Device Manager:
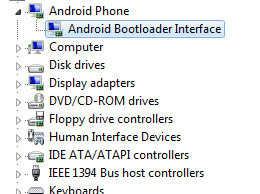
- Now go to where you extracted the files for unrevoked3 (from step #1 above) and double-click on relfash.exe.
- unrevoked3 will launch and you should see a screen like this:
- On the phone, make sure “FASTBOOT” is selected and then press the power button.
- On the “FASTBOOT” screen, press the Volume Down button to select “REBOOT” and then press the power button. There’s no need to press Power and Volume Down, just sit back and wait now as unrevoked3 does it’s thing. You can watch the status messages change on the unrevoked3 screen. It will reboot more than once so don’t worry.
- Once it is finished, the unrevoked3 screen will say “Done!” and your phone should now be displaying the new ClockworkMod Recovery menu.
- Close the unrevoked3 window.
- You could now use the built in nandroid backup app in the ClockworkMod Recovery to back everything up, but I prefer using Titanium Backup so I’ll go over how to get that installed in the next section.
- Make sure “reboot system now” is highlighted on your phone and then press the optical joystick to reboot (pressing the power button will only put it to sleep).
- Congratulations, you have just rooted your HTC Droid Incredible!
- Now it’s on to getting backup software installed and working.
Do a nandroid Backup
Doing a nandroid backup will back everything (like taking a snapshot) on your phone, just in case anything goes wrong during the ROM installation process and you need to go back to your original configuration (unless you brick your phone). This is a bit different than doing a Titanium Backup, which just backs up apps and system settings, and it is recommended that you do it. Make sure that there’s plenty of free space on your SD card before you do this (that’s where the backups are stored). It’s really simple so follow these steps:
- Boot your phone to the HBOOT menu (with the phone powered off, press and hold the volume down button and the power button at the same time).
- Once at the HBOOT menu, press Volume Down to select “RECOVERY” and then press the power button.
- Wait for the CLockworkMod Recovery menu to appear and then use the volume keys or the optical joystick to select “backup and restore” and then press the optical joystick.
- Select “Backup” and then press the optical joystick.
- The backup will start and will take a while to finish. Wait for it to finish.
- Once the backup has completed it should say “Backup complete!” on the screen.
- Select “reboot system now” and press the optical joystick.
- You phone will now reboot and that’s all that needs to be done for the backup.
Hot to Install Titanium Backup and Backup Everything
IMPORTANT! These steps will unlock NAND (set Android phone’s security level to S-OFF). As with rooting, doing this will void your warranty. However, since this was initially released, a tool to change from S-OFF to S-ON has now been released, so you can switch back. PLEASE READ THE INFO on unrevoked’s website before you continue!
- PLEASE READ THE INFO on unrevoked’s website before you continue!
- Download the most recent “unrevoked-forever.zip” file to a temp location to your computer and then copy it to the root of your SD card.
- Now that you have rooted, there’s no need to rename files to update.zip since you can browse and install files from your SD card now.
- After you have copied “unrevoked-forever.zip” to your SD card, reboot your phone to the HBOOT menu (with the phone powered off, press and hold the volume down button and the power button at the same time).
- Once at the HBOOT menu, press Volume Down to select “RECOVERY” and then press the power button.
- Wait for the CLockworkMod Recovery menu to appear and then use the volume keys or the optical joystick to select “install zip from sdcard”. Once you have selected “install zip from sdcard” press the optical joystick, not the power button.
- Select “choose zip from sdcard” and press the optical joystick.
- Browse to “unrevoked-forever.zip” and select it (you can go up from the top to get to the bottom…it’s a little faster) and then press the optical joystick.
- Select “Yes – Install unrevoked-forever.zip” and then press the optical joystick.
- unrevoked forever will then be installed. Once it completes it will say “Install from sdcard complete.” You should also see “Update successful.” a couple lines up from the bottom.
- Press the power button to get back to the main menu (the power button works kind of like a back button in the ClockworkMod Recovery.
- Select “reboot system now” and press the optical joystick. Your phone will now reboot.
- IMPORTANT: Unplug the USB cable, or make sure that your SD card is mounted on the phone (not your PC) before you continue.
- Now we’ll install Titanium Backup. By default it will install to and use your SD card for backups. If you don’t have a very big SD card then I would recommend that you get a larger one.
- Once the phone has rebooted, go to the Android Market and search for and install “Titanium Backup” (by Joël Bourquard). Note: I would recommend that you donate $5.99, it’s well worth it in my opinion since it speeds it up considerably and adds some other useful features.
- Once Titanium Backup has been installed, open it up.
- You will be prompted to allow superuser access, so just click “Allow”.
- You’ll then get an Error that says “Sorry, I could not acquire root privileges…” (and some other stuff), just select OK.
- Click on the button that says “Problems ?”.
- Read the info about “Auto-upgrade for BusyBox” if you want and then select “Yes, do it”.
- BusyBox will be downloaded and installed and Titanium Backup will exit (so it can be restarted).
- Open up Titanium Backup agian (this time the error about root access should be gone). You are then warned that you need to change some settings in order for restores to work correctly. Go to your phone’s Settings > Applications and check “Unknown sources”, read the message and select “OK”. You can leave this unchecked if you want for now, but just remember that you’ll need to check it whenever you use Titanium Backup. “USB Debugging” also needs to be enabled for Titanium Backup to work correctly, if it isn’t it will warn you and then you can go and turn it on (Settings > Applications > Development and check “USB Debugging” and then select “OK” to allow it.
- To back everything up, first make sure that you’ve got plenty of room on your SD card, and in Titanium Backup select “Backup/Restore”, press the Menu key and then select “Batch”.
- Find the line that says “Backup all user apps + system data” and press the button that says “RUN” next to it.
- Everything is selected by default and it will kill active apps. You can make whatever changes/selections you want here, but I’d just recommend the defaults for this initial backup. So, just press “Run the batch operation” and the backup will start. Now, if you haven’t purchased the donate version this will take a long time. So go ahead and spend a little money and make your life easier. 😉
- Once the backup completes it will bring you back to the list of all the apps and you can see the status of everything that has been backed up (press Menu > Legend to get info on what the icons next to each app mean).
- Exit out of Titanium Backup. The HTC Sense UI will restart since it was killed to backup stuff. This is OK.
- Now that everything has been backed up you’re ready to wipe everything and get some Froyo goodness on your phone!
More info on how to use Titanium backup can be found on the LegenDroid Community, including documentation.
Install Sky Raider ROM with Flash 10.1
I chose the Sky Raider ROM, because at this time it was the only Froyo (Android 2.2) ROM that I found that seemed to have everything working now. You don’t have to use this one, but it’s working great for me! I suggest you read all about it first before you use it, there’s some good info about what it has and doesn’t have as well as some optional stuff you can install. There’s also a FAQ.
- WARNING!!! This process will wipe all your data from your phone! Make sure everything has been backed up before you continue!
- Download the latest Sky Raider ROM (version 2.5.2 when I wrote this) from XDA Developers. There’s one with Sense UI and one without. Copy the file to the root of your SD card.
- Boot your phone to the HBOOT menu (with the phone powered off, press and hold the volume down button and the power button at the same time).
- Once at the HBOOT menu, press Volume Down to select “RECOVERY” and then press the power button.
- Wait for the CLockworkMod Recovery menu to appear and then use the volume keys or the optical joystick to select “wipe cache partition” and then press the optical joystick.
- Select “Yes – Wipe Cache” and press the optical joystick.
- Once the cache has been wiped, select “wipe data/factory reset” and press the optical joystick.
- Select “Yes — delete all user data” and then press the optical joystick.
- Once the data wipe has completed, select “install zip from sdcard” and press the optical joystick.
- Select “choose zip from sdcard” and press the optical joystick.
- Browse to the “SKYRaider2.5.2Sense.zip” file you downloaded (or whatever it’s named) and select it (you can go up from the top to get to the bottom…it’s a little faster) and then press the optical joystick.
- Select “Yes – Install SkyRaider2.5.2Sense.zip” (or whatever it’s named) and then press the optical joystick.
- Once the update is installed it will say “Install from sdcard complete.” on the screen
- You’ll notice there’s no option to reboot from the menu it shows, so press the power button to get to the main menu and select “reboot system now”.
- Sit back and wait for Froyo to boot/install.
- Once you have booted and run through the initial configuration, it’s time to install Flash 10.1.
- First we need to allow the installation of apps from unknown sources. So, go to Settings > Applications and then check the box next to “Unknown sources” and tap “OK”. Go back to the home screen.
- Now, open up the apps menu and then open ASTRO and accept the license agreement.
- You should be in the root of your SD card, so scroll down to the “skyraider” directory and then press it.
- You should see a file named “install_huluflash_player”. Tap the file and then tap “Open App Manager”.
- Press Install. Pres Install again. Press Done when it finishes installing.
- To check to see what version of Flash you now have, you can open up the browser and go to http://www.whatismyflash.com/ and it will tell you. The build with Sky Raider 2.5.2 is version 10.1.72.
- Don’t forget to call “*228” and then press 1 to reprogram you phone!
There’s a newer, supposedly official, version of Flash 10.1 (Version 10.1.92.8) available now. More info about it from Droid Life. You could also try to download it directly from here.
Other Goodies for Sky Raider and Froyo
I also added the optical joystick wake script (load from recovery menu and browse to .zip file) and Wireless Teather (.apk file you can install from your phone). Don’t forget the Chrome to Phone app either (found in the Market).
How to Restore Apps Using Titanium Backup
Once I got into it, I really didn’t use Titanium Backup to restore much. I had a lot of junk on my phone anyway so this was a good chance to start fresh and only install what I actually use. This isn’t a comprehensive section about Titanium Backup, mostly because I haven’t used it much. But, I’ll share what I did.
To restore a single app, open up Titanium Backup and press “Backup/Restore” press Menu > Filter and choose options or enter full or partial app names to find what you’re looking for. Once you find the app, just tap it and then tap restore. You’ll then have the option to restore the “App only” or the “App+Data”. I really only used this for apps that I wanted to restore that had data/config info that I didn’t want to lose or re-input. If there really wasn’t any data associated with the app I just downloaded it from the Android Market. You can also press Menu > Batch if you want to restore a bunch of missing apps all at once. I’m a little hesitant to do it this way though since I think there’s stuff that could get restored (if you’re not careful which option you run) that would mess up or not be compatible with the new ROM. Anyway, if you want to restore all the missing apps, you can just tap “Restore all missing apps + system data” from the Batch screen.
One other thing that’s kind of cool is that Titanium Backup recognizes the Labels you setup in Apps Organizer so you can use those Labels to filter apps in Titanium Backup.
That’s about all I have for now. It’s a pretty cool app and I’m not even getting close to using it’s full potential. More info on how to use Titanium backup can be found on the LegenDroid Community, including documentation.
How to Remove Root and Downgrade to the Stock ROM
- This will wipe the data from your phone so backup everything first!
- Download PB31IMG.zip. You might want to go here and pull it from the post in case my link fails. It should be about 139 MB. Once you have downloaded the file, place it in the root of your SD card (should be formatted FAT32/4096 bytes).
- Reboot into HBOOT: Power down the phone and then press and hold power and volume down.
- It should automatically see and load the file. Once it’s done, press the Volume Up button to start the update.
- It will take a little while for the update to get applied and you’ll see a little progress bar appear multiple times in the top right corner.
- Once it finishes the update it will ask you to reboot the device.
- Press the Volume Up button to reboot the phone.
- After it finishes booting (be patient, it will eventually finish) you will then have to run through the initial setup (you can skip it all since you’ll have to do it later anyway).
- On you finish the initial setup you can go in and check that everything looks ok and that the radio baseband has been taken back to version 1.00.03.04.06 (Settings > About phone > Software information > Baseband version).
- There you have it, you’re now back to the stock Verizon ROM and you can start from the top to get Froyo installed.
Leave a Reply
You must be logged in to post a comment.