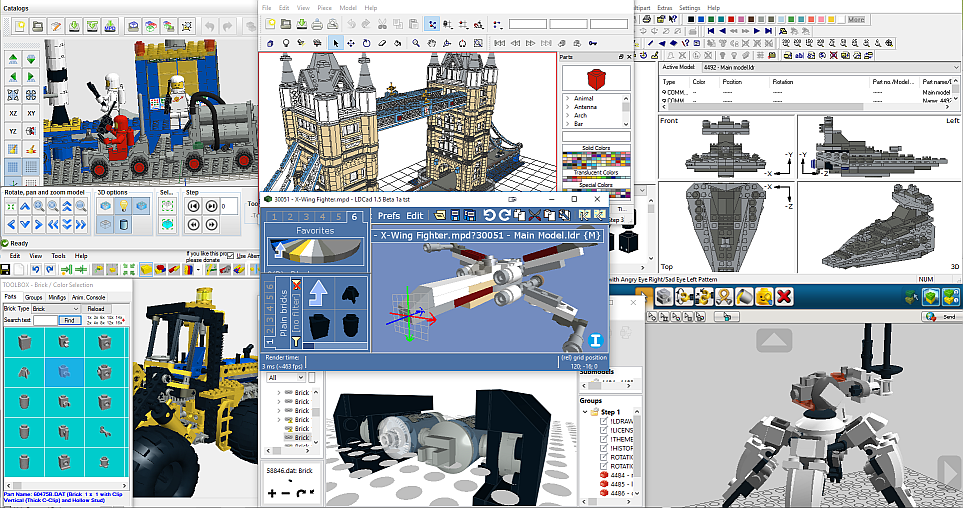
I’ve loved LEGO all my life and I recently found out that a bunch of cool LEGO building/design/CAD programs existed. So, I set out on a quest to find the best one for me. Not knowing anything about these, or much about the LEGO community online, it was a little difficult to find out what was available. I figured I’d share my quest so others might benefit.
Not knowing what these programs had to offer, I had a pretty short list of evaluation criteria:
- Try to build the same model in each program and see how easy it is to build (my primary objective)
- Must be compatible with Windows 10 (OS I’m running on my main PC)
- See how easy it is to build without reading the documentation first (not that consulting it was out of the question)
- Settle on a program that appears to be somewhat current and maintained
My primary objective was to find something that I could use to build LEGO models. I didn’t really dive into the more advanced features that some of them offered, like parts authoring, scripting, animation, creating build instructions, exporting parts lists, etc.. To be honest, I didn’t really know that some of these features were available when I started my search. Going into detail about all the different features would make for a very long post and that’s not my main objective. After having used the programs a little, I settled on the following evaluation criteria, since they cover the basic building experience that I was originally looking for:
- Adding parts (i.e. part searching and selection)
- Manipulating parts in the build area
- Changing part colors
I didn’t spend the same amount of time with each application. Because of that, some might complain that I wasn’t “fair”. Well, to be “fair”, this isn’t a professional review/evaluation, it’s just documentation of my personal quest to find a program that works for me. Take what you will from it. Maybe you’ll find that you love one of them that I didn’t particularly gravitate towards, that’s the wonder of personal choice! 🙂
Anyway, on with the good stuff!
Programs that I looked at, in alphabetical order:
- JBrickBuilder
- LDCad
- Lego Digital Designer (LDD)
- LeoCAD
- MLCad
- MOC Builder
- SR 3D Builder
For clarification, most of these are based on LDraw, a library of LEGO parts and software that can be used “for modeling LEGO creations in 3D software on a computer.”
Here’s a little more information about each one of the programs, as well as a link to where you can download it:
- JBrickBuilder – Version 0.4.1b (2015-06-12) – JBrickBuilder is a LEGO builder in Java for the LDraw part library.
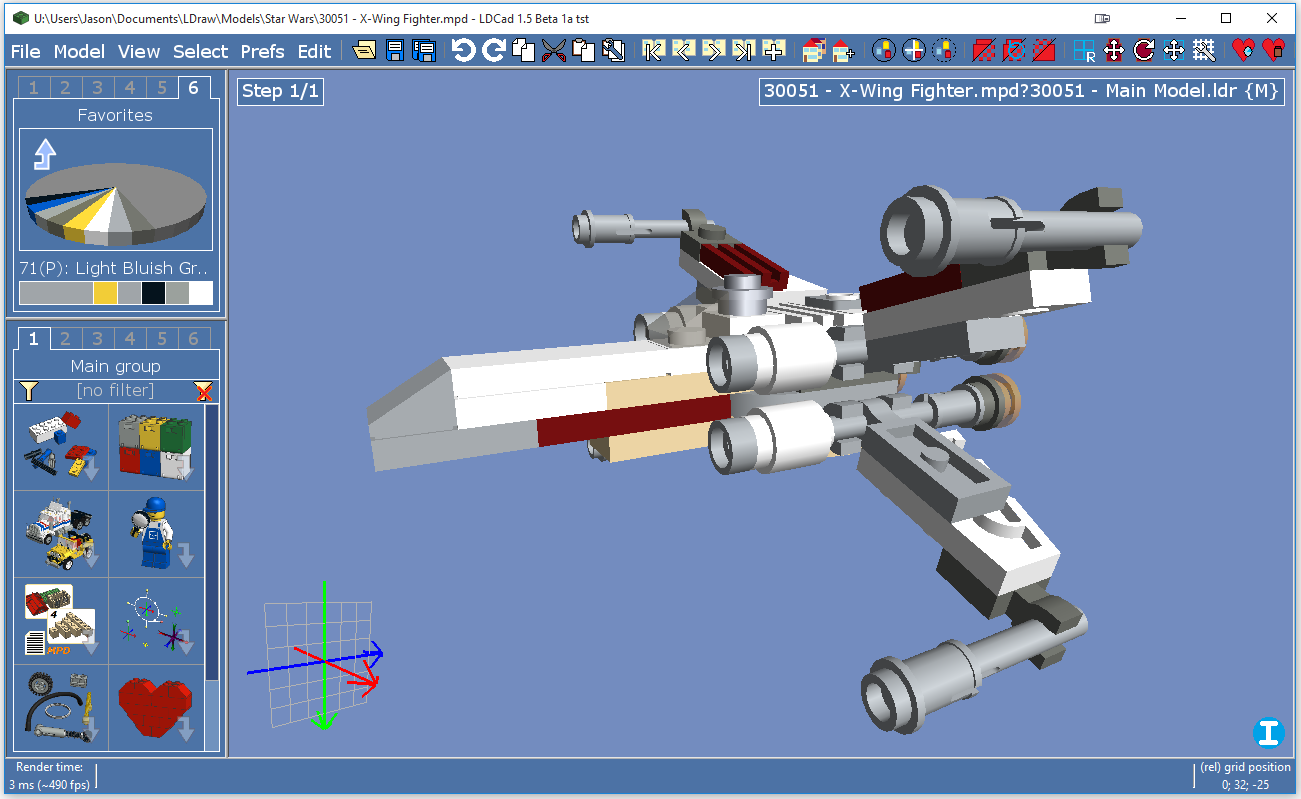
- LDCad – Version 1.4b (2015-02-28) – LDCad is an LDraw model editor targeted at both the starting and more experienced LDraw user.
- LEGO Digital Designer (LDD) – Version 4.3.8 (2013-12-07) – LDD is LEGOs proprietary CAD program for designing LEGO models and is not based on the LDraw library.
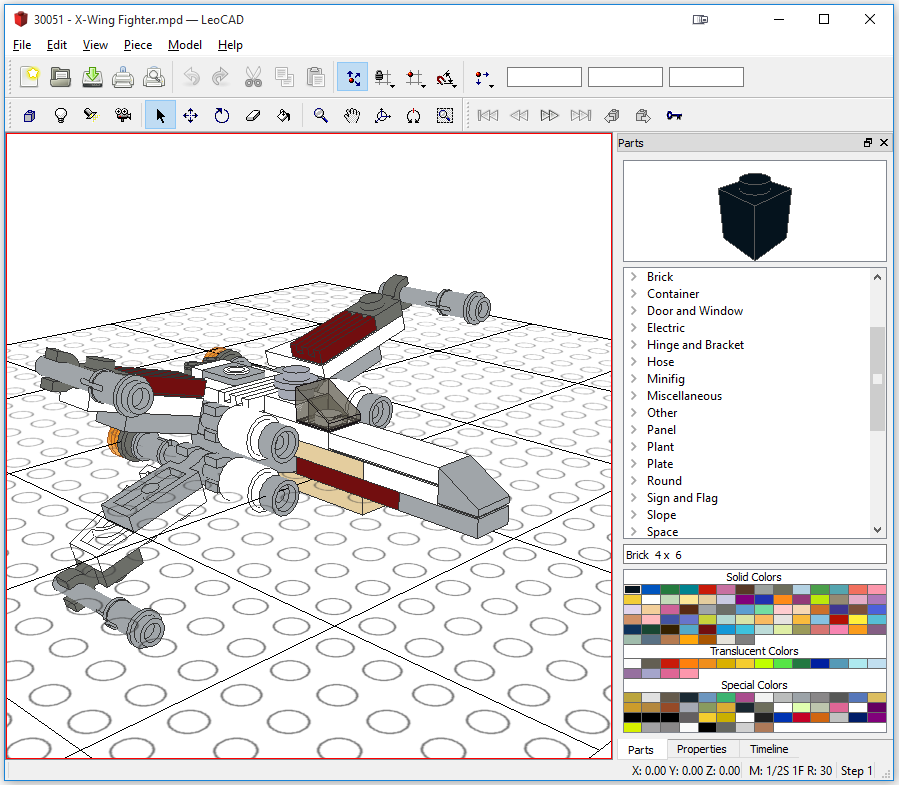
- LeoCAD – Version 0.82 (2015-04-04) – LeoCAD is a CAD program for creating virtual LEGO models, Minifig Wizard included. It has an easy to use interface and currently includes over 6000 different pieces created by the LDraw community. LeoCAD maintains its own proprietary parts library, but is based on the LDraw parts library. The libraries are not compatible, but you can import LDraw parts in LeoCAD. It supports basic animation (via keyframing) and can export to 3DStudioMax, POV-Ray, and Alias Wavefront.
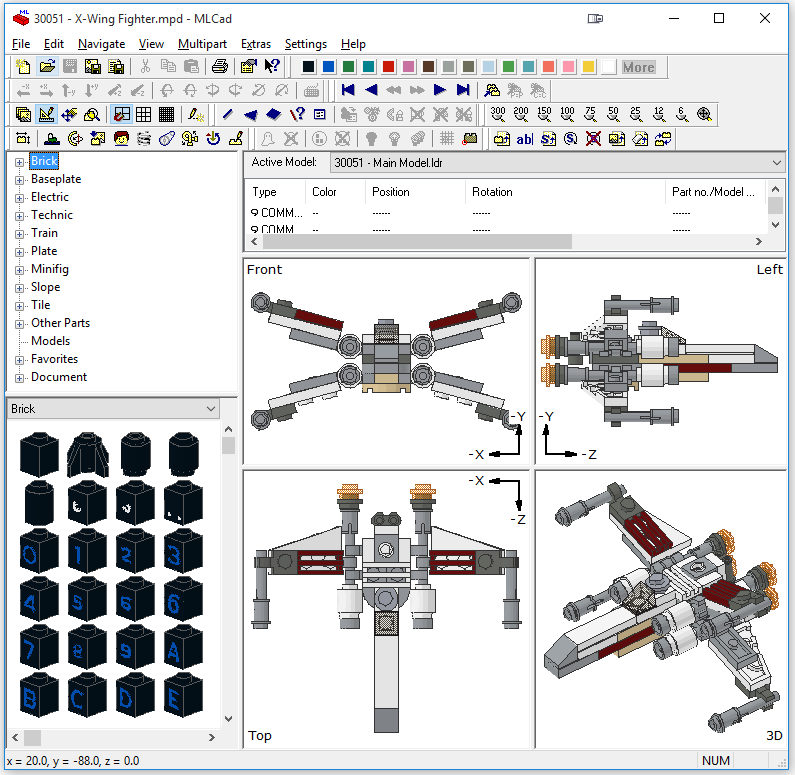
- MLCad – Version 3.40 (2011-12-27) – MLCad is a highly popular LDraw-based editor for Windows and Linux.
- MOC Builder – Public Release_20150202(bug fix2) (2015-02-02) – MOC Builder is a tool developed by Bricklink’s tool development team and touts the ability to easily order whatever you create, via Bricklink.
- SR 3D Builder – Version 0.9.7.81 (2014-08-25). SR 3D Builder is branded “The most advanced LEGO PC CAD for TECHNIC Model”, and many people seem to support that. My initial findings had me pretty excited about this software and quickly put it at the top of my list to evaluate. Sadly, Sergio Reano, the creator of SR 3D Builder passed away last fall and this incredible programs is no longer maintained (as of this writing).
LDCad, LeoCAD, MLCad and SR 3D Builder are packaged in the LDraw All-In-One-Installer (AIOI), which I recommend you use for installation of these programs, and can be downloaded here.
The following table is for reference and highlights some of the similarities and differences between the programs:
| JBrickBuilder | LDCad | LDD | LeoCAD | MLCad | MOC Builder | SR 3D Builder | |
|---|---|---|---|---|---|---|---|
| LDraw Library | Yes | Yes | No | Proprietary based on LDraw | Yes | Yes | Yes |
| Part Snapping | Yes | Yes | Yes | No | No | Yes | Yes |
| Export to Bricklink Wanted List* | No | No | No | No | No | Yes | No |
| LDraw and LDD file support | Yes | Yes | Yes | Yes | Yes | Yes | Yes |
| Create Building Instructions* | No | No | Yes | No | No | No | No |
| Parts History List | Yes | Yes | No | No | No | No | No |
| Parts Favorite List | No | Yes | No | No | Yes | No | No |
| Windows | Yes | Yes | Yes | Yes | Yes | Yes | Yes |
| Mac | Yes | No | Yes | Yes | No | Yes | No |
| Linux | Yes | Yes | No | Yes | No | Yes | No |
* Exporting to Bricklink Watned List (to buy the model you build), as well as creating build instructions, can be accomplished through different programs for all of the LDraw programs. Checkout BrickUtils to export a parts list and here’s a guide to using LPub to create instructions.
I struggled a little with how to present all the data for this post. Originally I was going to list each one individually and talk about my experience with it. However, I found that I would compare one with the others, so I felt a better way to present my findings was to “review” by feature. Towards the end is a more complete list of features for each program, which is probably more info than is necessary, but is that so bad? 😉 Anyway, off we go…
[nextpage title=”Adding Parts”]
When you fire up one of these programs, the first thing you will probably do is try to find and add parts to the “build area”. Yeah, pretty much a no-brainer, right? 🙂 There were two main ways parts were presented: list all parts by name or list all parts by picture. Each of these organized the parts into different categories to help make searching easier. Some combined both methods. My personal favorite of the two was listing the parts by picture. It was much faster and easier to pick out a part visually rather than having to read each individual description to make sure it was the correct part. For clarification, the programs that listed parts by name would show a picture of the part once you selected it (before you dragged it out to the build area), so it’s not like it was just a list and you had to “guess” what the part looked like before you drug it out.
Let the battle for best part management commence!
JBrickBuilder
JBrickBuilder doesn’t have what I would call a “traditional” part tree window in that you actually have to click a button, which brings up a search window, before you can start searching for parts. Searching for parts is relatively easy and allows you to search by part name, part description or part number. Filtering is automatic as you start typing, which is a nice feature. You can also select different categories to browse for parts. I didn’t really like that you had the extra step of clicking the “Add brick” button every time you wanted to add a part.
Once you select a part it is easy to add anywhere on the build area. You simply move the mouse to where you want it, adjust orientation with the arrow keys (90 degree increments), and then left-click to add it. The part remains where you put it and you can easily add as many of that part as you want. When you are done with that part you press ESC to exit part add mode.
There is a button to select from recently used parts, but I didn’t see any way to “Favorite” parts.
Summary: Finding parts worked really well and once you found the part it was easy to add to the build area.
LDCad
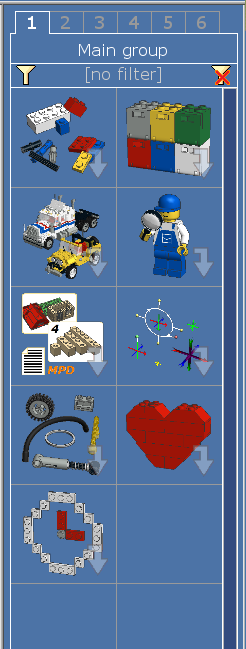
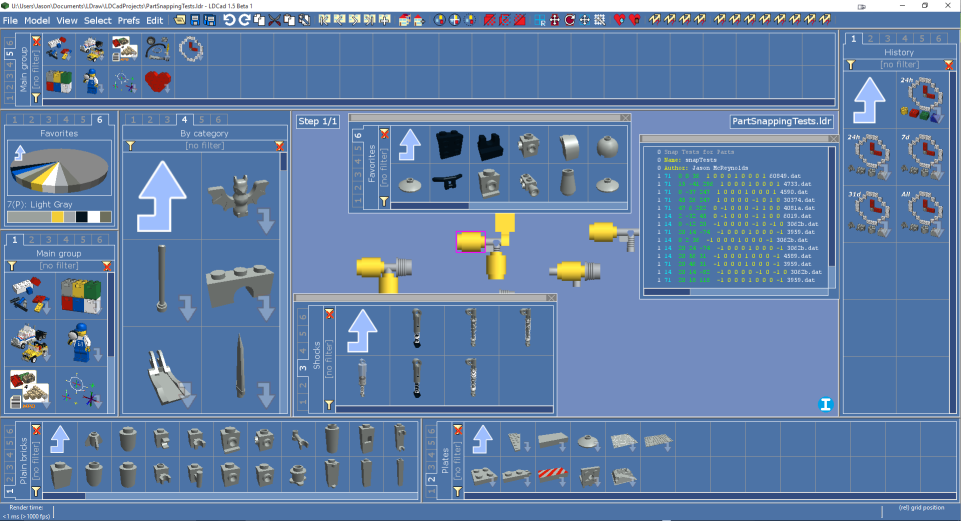
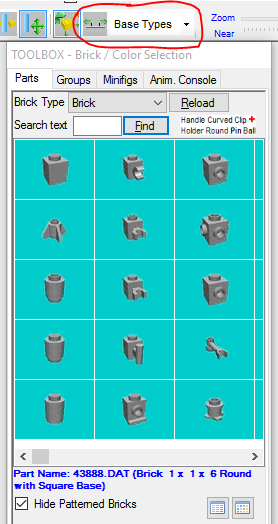
LDCad has a nice, 6- tabbed window on the side that allows you to setup 6 different part bins. This allows you to quickly jump between different part types or categories. It also has the ability to save parts to a Favorites list and has a history list as well (broken down by: the last 24 hours (two lists, one with parts and one with the parts and the colors you used for those parts), parts in the last 7 days, parts in the last 31 days and all parts). I found this the quickest and most useful approach to handling parts.
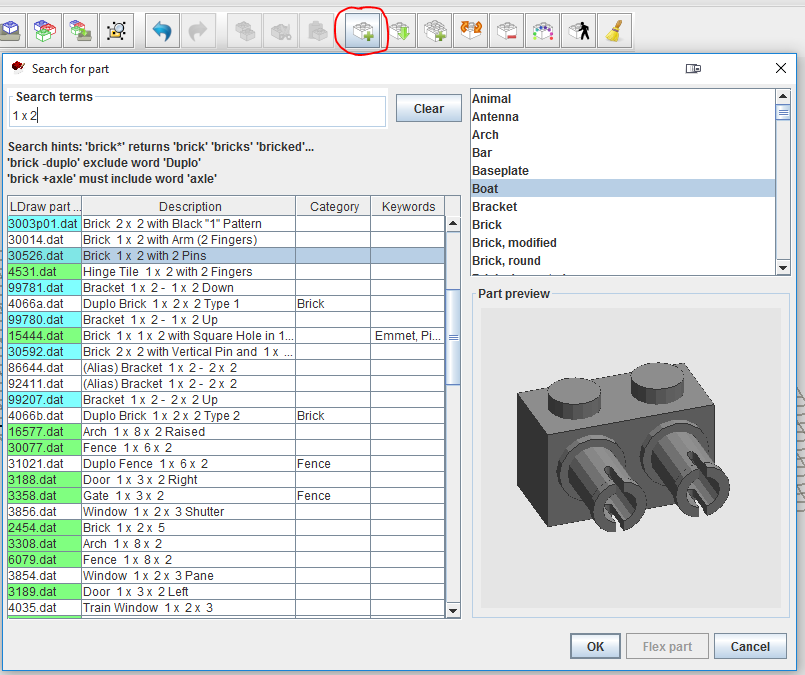
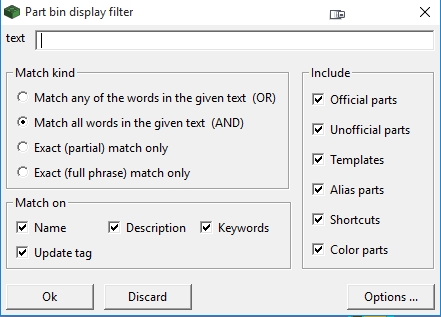
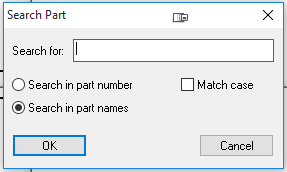
You can quickly browse function or category, among other options. Once you drill down you can even search/filter the results further. Searching everything for a particular part had me confused at first, I didn’t realize that you had to click the minifig with the magnifying glass to search all parts. Once I did that I was able to find anything I wanted. The search options are very nice as well (no other program I looked at had as many options), I just needed to make sure that I checked all the “Match on” options for best results. Here’s a screenshot of the search (filter) options:
Once you find the part you want you simply drag it to the build area and place it where you want. While dragging a part out to the build area you can use the arrow keys to orient it, in 90 degree increments, in the direction you desire. Pressing CTRL+<Arrow Key> allows you to rotate the part by 45 degree increments to correctly position it. Not sure I liked this CTRL+<Arrow Key> approach of having to keep the left-mouse button held down to be able to rotate the part when you drag it out but, given how parts are manipulated once on the build area (more on that later), it makes sense. I actually got these tips (for orienting parts while dragging them out) from the tutorials, it’s wasn’t readily apparent you could do that when dragging the part out.
You can quickly go back to the part bin and select the same or a different part to drag out. Or, you can press Insert to create a copy of the current selection or working part.
Summary: Finding parts worked very well, and once you found the part it was really easy to add it to the build area.
Note: The latest 1.5 Beta 1 version allows you to have more than one parts bin (docked or floating window) and you can arrange them any way you like! You can go crazy when it comes to setting up part selection bins!
Lego Digital Designer (LDD)
LDD’s part bin breaks parts out by different categories and also allows you to search all of them. The categories didn’t always make sense to me, but after using it for a little while I started to get the hang of it. However, many times I would have to go online and search for a part number to find what I was actually looking for because there were so many parts to scroll through. One reason there were so many parts was because not only did it have the part, but it had every color of the part available (there’s actually a little filter button at the bottom of the part window that will let you filter by color, which I didn’t know existed originally). This added way more parts to the screen, whereas the other programs would only list the part once and allow you to choose the color.
The search feature works fairly well if you are somewhat familiar with the part names. For example, I searched for “1 x 2” and it listed a lot of other stuff besides bricks. I searched for “1 x 2 brick”, and nothing showed up. I searched for “brick 1 x 2” and it did return the desired results. Once familiar with part names it would probably be easier to search. Search results were grouped under the different categories, which made it easier to find the part later if you didn’t want to use the search box.
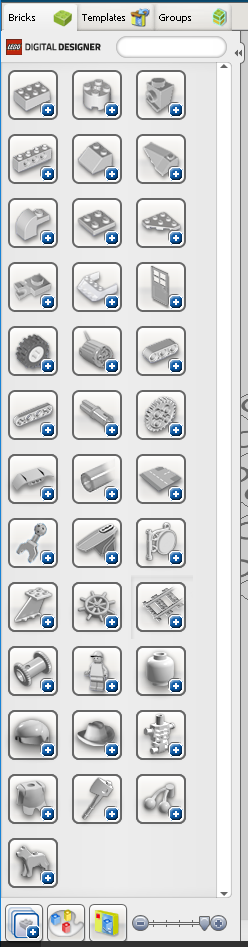
Having the pictures was nice, but once you got a couple categories expanded (sometimes just one) it was a scrolling nightmare to try to find something.
There is no way to “Favorite” parts and I didn’t see any part history that could be referenced to re-use previously used parts.
Summary: Finding parts was fairly easy and adding parts to the build area was really simple.
LeoCAD
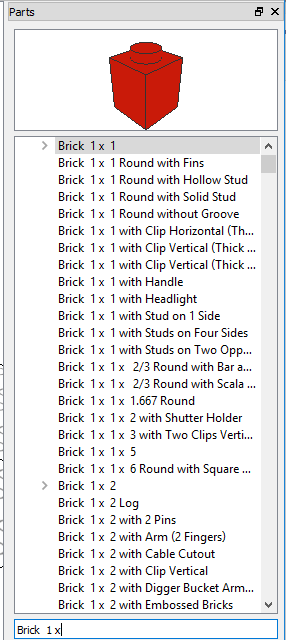
LeoCAD had what I would call the “traditional” part list window. Categories were displayed and you could drill down into them to find the part you wanted. No pictures were displayed until you selected a part, you just had text descriptions to use to try to find what you were looking for. I found that this took a lot longer to find parts because you had to read the individual descriptions. Pictures convey the data much faster. Searching for pats was easy though, and you could search by part number, description or name. Results would be filtered automatically as you typed, and search suggestions would be offered as well. However, search seemed to use the “Starts with” search logic and, whereas the other programs I used usually just used single spaces in the part names, LeoCAD would add extra spaces. This made it harder to find parts until I figured it out. For example, if I typed in “1 x 2 Brick” it didn’t find anything (nothing starts with 1 x 2). If I typed in “Brick”, results were displayed, including “Brick 1 x 2” as a suggested search term. If I kept typing “Brick 1” nothing would display because there are two spaces between Brick and 1 and two spaces between the x and the second number. This confused me at first.
Once you find the part you can easily drag it out onto the build area. I mistakenly tried to drag the part image the first time, and that doesn’t work. You have to select the actual part name from the list and drag that out to get the part. Thought that was kind of odd.
Once you drag a part out you can move it with the arrow keys, but orienting it has to be done after you place the part. I didn’t really care for this approach, it seemed to be a bit of a hassle to quickly orient new parts.
I didn’t see any way to “Favorite” parts and I didn’t see any part history that could be referenced to re-use previously used parts.
Summary: Finding parts was a little troublesome to start with, but once the part was found it wasn’t to difficult to add the part to the build area.
MLCad
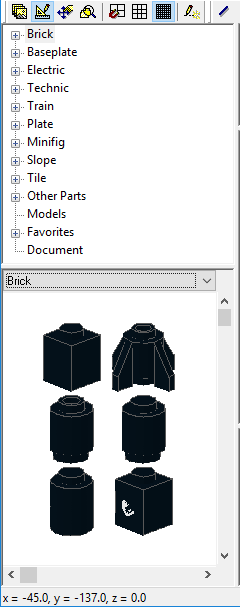
From what I found in my searches, MLCad has been somewhat of a standard for building LEGO models. The part window is split in half, with categories displayed on the top and pictures of the parts for that category displayed on the bottom. You can scroll up/down in the picture window to view the parts in that category, or you can scroll left/right to change the category and view its associated parts.
Searching for parts was a bit tricky at first, I didn’t see any obvious way to do that. But, after poking around the menu options I found that “Edit > Find”, or CTRL+F, would bring up the search box:
Searching was pretty easy once I found the search box. However, it appears that you can’t search on anything but a single term. If I tried to add a space and another term (i.e. “Brick 1”) it would say “The search string is invalid!”. Kind of annoying. I also had a hard time finding some parts that I had numbers for. For some of them I verified the part number online and found that there were alternate part numbers that worked. I think I had one or two that didn’t work at all. Don’t remember what the part numbers were, but thought that was a little strange.
Once you find the part you are looking for, you can either grab the description or the picture and drag it out onto the build area. There doesn’t seem to be any way to quickly orient the part while, or after, dragging the part to the build area.
If you right-click on the the part in the category list view you can add the part to your “Favorite” category for fast and easy reference later. I didn’t see any part history that could be referenced to re-use previously used parts.
Summary: Finding parts was fairly easy as was adding them to the build area.
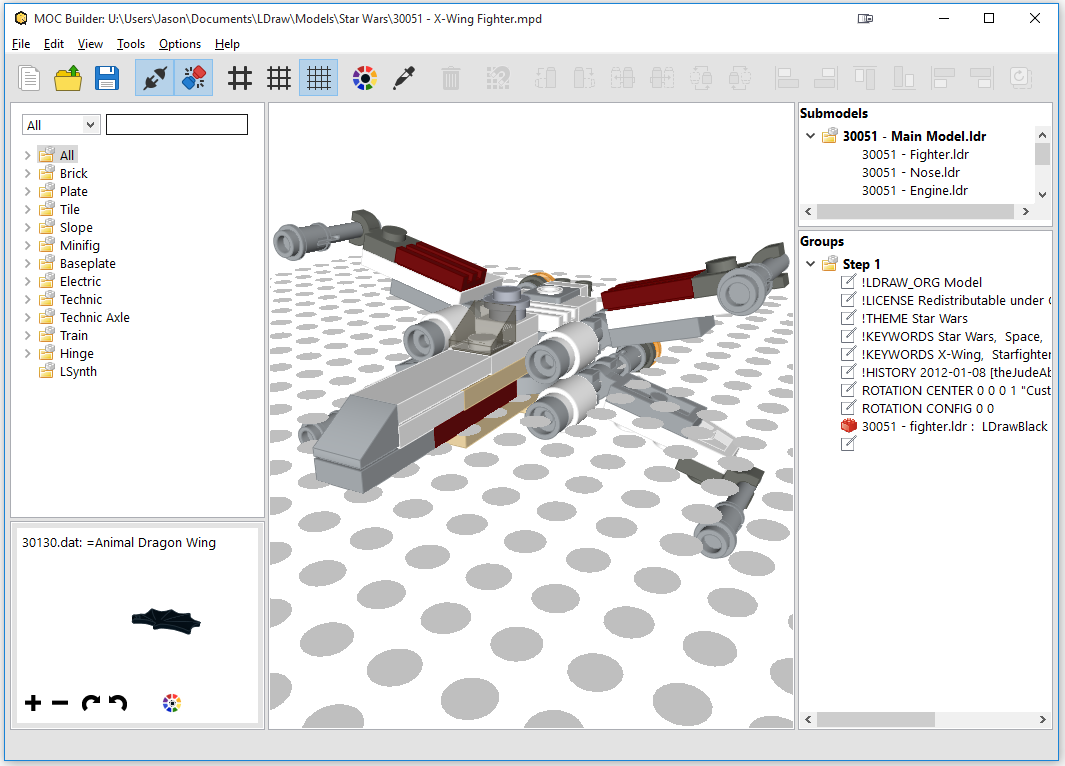
MOC Builder
MOC Builder’s part window is similar to LeoCAD’s, in that it lists categories that you can browse and also has a handy search box:

I had the same problem with MOC Builder as I did with LeoCAD: trying to find parts via a text description is much slower than browsing a bunch of pictures. You only see a picture of the part once you select it from the list. Search works fairly well and it is nice that it breaks the results down by category as well as an All bucket. However, search seemed to use “Starts with”, like LeoCAD and LDD, and if you search for “1 x 2 brick”, nothing shows up. If you search for “Brick 1 x 2” you get the desired results.
Once you find the part you want you can drag either the description or the picture out to the build area. Once the brick is on the build area you can easily orient it using the arrow keys, much like LDD. I really liked being able to quickly orient parts this way.
There is no way to “Favorite” parts and I didn’t see any part history that could be referenced to re-use previously used parts.
Summary: Finding parts worked, and it was pretty easy to add them to the build area once you found what you were searching for.
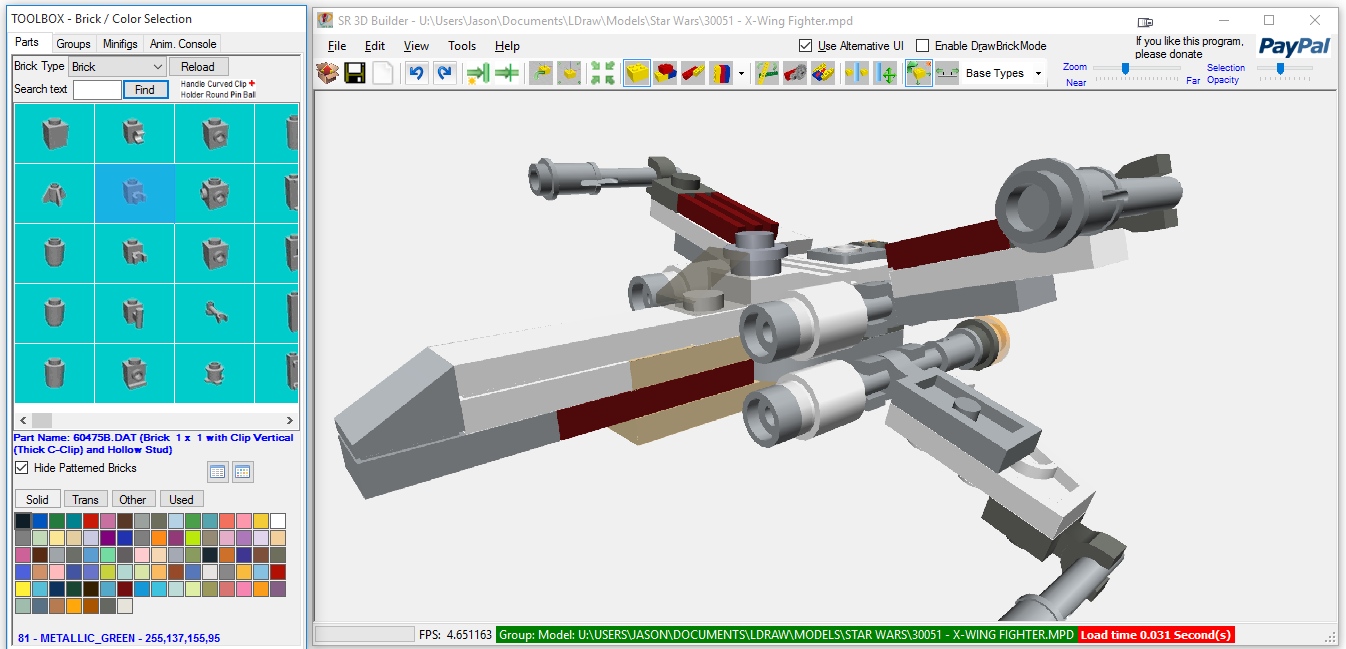
SR 3D Builder
NOTE: I could not get SR 3D Builder to run on Windows 10 without running the compatibility troubleshooter and setting the compatibility mode to Windows 8. Same thing for Windows 7, I had to run it in compatibility mode for Windows XP SP3 to get it to run on Windows 7. Even then it would crash and didn’t always seem to work correctly. So, with that said, some of the weirdness I experienced could have been due to it not running correctly on Windows 10 or Windows 7.
SR 3D Builder’s part search uses drop down menus to filter by categories and then displays pictures of the parts in that category. This is similar to some of the other programs and makes it pretty easy to browse through categories to find what you are looking for. There is also a “Category” selector in the main toolbar, that seems to limit the “Brick Type” in the part window.
Searching was harder for me to figure out, but it looked like it could be pretty powerful. Searching for part numbers and part names had mixed results and was frustrating more than anything. I finally gave up and consulted the manual. To search for part numbers you have to precede them with an asterisk “*”. Using a “-” before the word, the selected brick type is searched for.
Once I did find the part I was looking for I thought I could just left-click on it and drag it out to the build area. That didn’t work. Double-clicking the part added it to the build area, but it didn’t seem to want to stay. I had to consult the manual again and found out that, after dragging the part to the build area, you have to press Space, Enter or right-click the yellow center of the “D-caddy” to add it to the model.
There is no way to favorite parts or a recent part list that I could find.
Summary: Frustrating to try to figure out how to search for parts and add them to the build area. Once I figured it out it wasn’t too difficult but was rather different than most of the other programs.
And the Winner for Adding Parts is…
All of the programs have a bit of a different take on managing parts, but after playing with all of them LDCad stands out to me. It is pretty simple to just drag parts out and place them. Having the ability to have 6 tabs, or 6 different part bins, along with the ability to favorite parts and a part history, really makes it easier to find and work with parts. Not to mention that the current beta release allows you to have as many part bins as you want (floating or docked windows)!
Winner for Adding Parts: LDCad
[nextpage title=”Manipulating Parts in the Build Area”]
Manipulating Parts in the Build Area
This is probably the most important part of my evaluation. How the program fared in this area really impacted my decision to continue evaluating it or move on to the next one. For this section, I did go back (after choosing my favorite) and work with each of them to try to include similar information for each one. I figured the extra effort would be a little more useful than just putting “I didn’t like it”. 🙂 So, if it seems like there isn’t as much information for a program, or if I have something incorrect (sorry), it’s probably because I didn’t spend as much time with that application.
JBrickBuilder
After selecting a part in JBrickBuilder you can use the arrow keys to orient it, a lot like LDD. Similar to LDD, parts snap to a build plane and you have to build up/down from there. The plane does not automatically adjust up if parts get added below the build plane. Once you get the part in position you just left-click and the part will stay. The next part you pull out will assume the same orientation of the last, or currently, selected part, which can be good and bad.
Part snapping works relatively well, but I didn’t spend much time building because I couldn’t figure out how to move parts once they were placed. Clicking on them and then trying to drag them didn’t do anything. I didn’t see any kind of move button either. In my brief try to figure out how to move parts in the build area, I couldn’t find a way.
The only way to really “move” parts is to use Ctrl+x to cut the part and then use Ctrl+v to paste it so that you can then move it to the position you want. I had to post on the LDraw forums to figure this out. This was not a very effective, or easy to figure out, way to “move” parts.
Right-clicking on parts seemed to only center on that part. I was hoping there would be some other options, but there weren’t.
Even though I couldn’t move parts, I did see that there was a button you could press to rotate them. After clicking the “Rotate tool” button and selecting a part I could rotate it, sort of. I could only rotate parts around the Y-axis, but couldn’t figure out how to rotate around another axis. Once you selected the part to rotate, you also had the option to manually the rotation value.
Selecting multiple parts is done by left-clicking and dragging a box around the parts you want to select and/or holding down Ctrl and left-clicking on the parts you want to select. Pretty standard.
There doesn’t seem to be a way to create groups (there might be though).
Ctrl+z will undo actions and Ctrl+y will redo actions.
Moving the camera around is pretty straight forward:
- Right-Click and move rotates the camera around.
- Shift+Right-Click and move pans the camera around
- Mouse wheel zooms in and out
However, sometimes I found it difficult to get the view I wanted when rotating the camera around.
Summary: I wasn’t too impressed with how JBrickBuilder’s build area functioned and wasn’t drawn to it given the other options available. Because of that I didn’t spend much time with it.
LDCad
LDCad’s build area doesn’t have a build plane like LDD, LeoCad and JBrickBuilder do. It has a wide open area where you can put parts wherever you want. Dragging parts out was easy, just find and drag out. Knowing certain shortcuts (see Adding Parts section) made it relatively quick and easy to start building. The next part you pull out will assume the same orientation of the last, or currently, selected part, which can be good and bad.
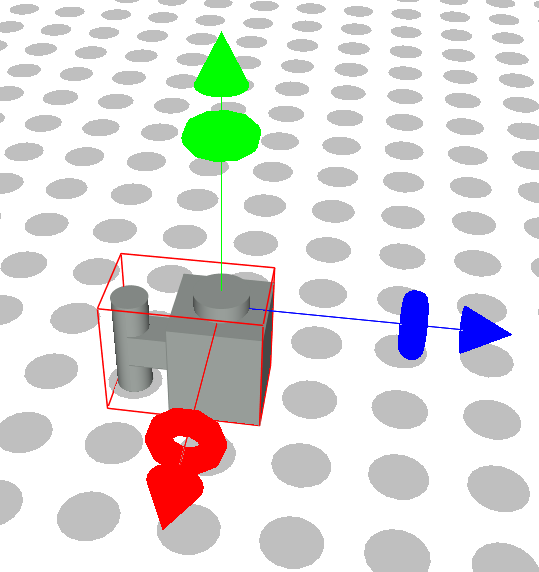
Moving parts around, once in the build area, was very easy, just drag it where you want it. You might have to rotate the camera around to drag it in the desired direction, but it was pretty easy. There’s also an editing pin that you can use to move and rotate the part or change the part’s center. The pin will change orientation based on the camera view. After learning that you can press “f” (front), “s” (side), or “t” (top) to re-orient the pin, without changing the camera view, things became much easier.
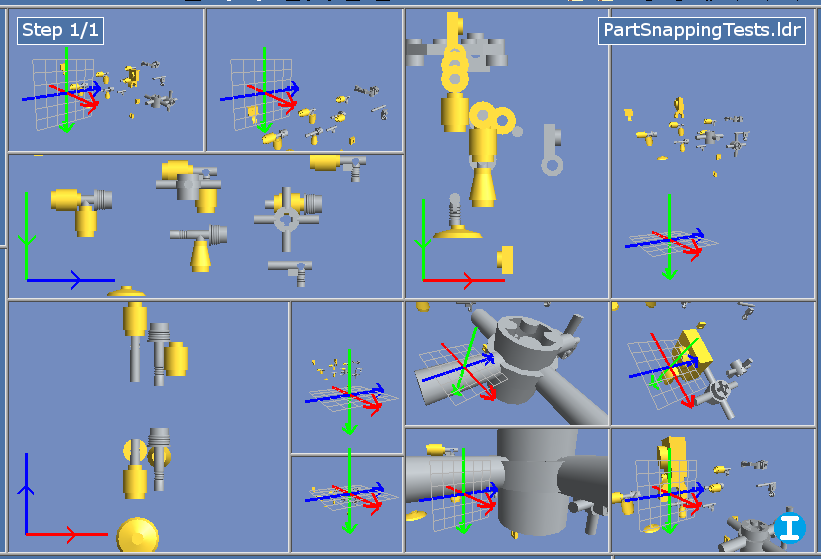
Part snapping is still in the works (not all parts work), but what worked made building really easy and it worked really well. Part snapping isn’t enabled by default, so don’t forget to turn it on (hover over the compass and hit “GS” so that it changes to “PS”, more on the compass later).
Selecting multiple parts was a little annoying, I always wanted to try and left-click and drag the mouse to select a group of parts and that would only change the view. You can’t left-click and drag to select multiple parts. To select more than one part you have to select one first, and then hold down Ctrl while you left-click the other parts. This can be a bit tedious if you have a complex group (I guess you could start grouping stuff early on and then keep adding).
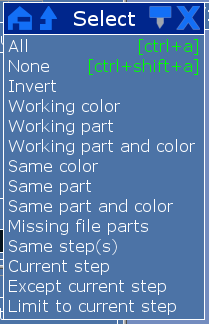
However, there is a pretty handy little select menu that has quite a few options to help you select parts (see screenshot below). One thing that I really like from LDD and SR 3D Builder, and didn’t see in any of the other programs, was the ability to select all parts connected to the current selected part. This option comes in handy when creating groups and it would be a welcome addition for all the programs.
Creating groups was rather easy (selecting multiple parts aside): select the parts you want and then press Ctrl+g. Parts will stay grouped and you can move them around as one part.
One other neat trick is that of pressing “o”. If you’re having problems lining up or positioning a piece that’s at weird angles, press “o” and it will change the grid orientation to match the current selection’s main part. Or, if nothing is selected it will reset to the absolute grid. This comes in really handy.
Ctrl+z will undo actions and Ctrl+Shift+z will redo actions.
Selecting a part and pressing Insert will copy it, as will Ctrl+c and Ctrl+v.
LDCad and LeoCad were the only ones that I found that would actually let you split the view (MLCad is split into 4 view by default, but I couldn’t find a way to change that). With LDCad you can split the view into multiple windows and then configure them for different camera positions. You can split horizontally, vertically or 4 ways. Once split you can easily drag the “split bars” to re-size the views. This can be a really useful feature. Once you setup a split view, pressing the space bar will toggle between the split view(s) and the single, main view. This is a pretty handy feature. Not sure what the limit on the number of split views is, but it looks like it should be able to accommodate some crazy configurations. 🙂
Camera movement is a little different than the others:
- Right-Click on the build area rotates the camera
- Shift+Left-Click pans the camera
- Mouse wheel zooms in and out
However, there is also this handy editing compass in the bottom left (shown expanded):
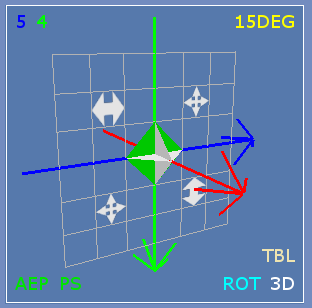
You can easily use this to pan/rotate the camera and get to certain options (e.g. grid spacing size, enable part snapping (the “PS”, which isn’t on by default), default rotation stepping, 2D or 3D view, trackball/spin camera, etc.). It’s pretty useful in many ways.
One other camera/view option that I’m really starting to love is called “trackball”. Here’s what the website says about this:
LDCad uses trackball rotation by default which means the starting location of the mouse click will influence how things rotate. The easiest way to visualize this is by imagining a big beach ball inside the editing area. If you ‘grab’ it at the left center and move to the right it will spin left ot right, but if you grab it bottom left and move to the top right it will spin diagonally and so on.
Many people don’t really like the trackball method, it is therefore possible to set rotation control to the more beginner friendly spin method discussed below in the compass chapter. But please don’t give up too quickly as you might learn to love the trackball method if given enough time to master it.
Another nice little trick is pressing “v” to toggle between the 3D and the 2D view. Once in the 2D view you can press “t”, “f” or “s” to view the top, front or side, respectively. It’s nice to quickly be able to switch between these views to position parts.
Summary: Until I figured out some of the shortcuts that were available, I wasn’t sure I liked how to move parts around. After I figured them out I really started liking this a lot more than some of the others. I also loved how you can easily setup multiple views and quickly switch between 3D and 2D views.
Lego Digital Designer (LDD)
Moving and positioning parts is easy to do, just drag a part onto the build area, use the arrow keys to orient it and then left-click to place the part. At one point I thought the next part you pulled out would assume the same orientation as the last part you moved, but I tried again and it didn’t seem to do that. Not sure what happened there.
Parts will automatically snap into place when dragged close to another part. However, sometimes I had a little difficulty connecting parts if they were off-centered or at certain angles.
Building, you start from a plane and build up, which I thought was a little strange. You don’t have the ability to position the part just anywhere along the Y-axis, when you drag parts out they automatically align with the plane and will snap to other parts when you get close to them. If you snap to the bottom of a part that’s already aligned to the building plane it moves the building plane down.
Selecting multiple parts was really easy, you could just drag the mouse around a group of parts to select all of them or just press Ctrl and left-click the parts you want to select. There were also several other selection options:
- Multiple Selection tool – when activated you just left-click all the parts you want to select, not need to hold down Ctrl.
- Connected Selection tool – when activated, selects all parts connected to the part you select. I found this a really handy way to select parts and wished it was in all the other programs. SR 3D Builder was the only other program that had this option.
- Color Selection tool – when activated, selects all parts on the screen of the same color you select.
- Shape Selection tool – when activated, selects all parts on the screen of the same shape you select.
- Color and Shape Selection tool – when activated, selects all parts on the screen of the same shape and same color of the part you select.
The selection options make it really easy to group parts together. Select the parts you want to group and then press Ctrl+g. Groups then show up under a Groups tab. Select the group you want to select all the parts for that group, or to add/remove parts to that group (adding/removing parts to an existing group was a little weird though). However, if you move parts from one group to another it will remove them from the first group and you can eventually end up with groups with no parts in them. Thought it was a little strange that it didn’t remove empty groups automatically. Sometimes I had quite a few empty groups to delete until I figured out how it worked.
Rotating parts anything other than 90 degrees is a little weird. In order to do this the part has to be connected to something that will actually allow it to rotate. Then you can use the Hinge tool to rotate the part however you want. If you think about it it kind of makes sense, but it was quite different compared to all the other programs in how it handled rotations.
There didn’t seem to be any way to create multiple views or go to any kind of 2D view.
Ctrl+z will undo actions and Ctrl+Shift+z will redo actions.
Ctrl+c and Ctrl+v worked like a charm for copying and pasting selected parts.
Moving the camera around is pretty straight forward:
- Right-Click and move rotates the camera around
- Shift+Right-Click and move pans the camera around
- Mouse wheel zooms in and out
Summary: A relatively easy to use program with excellent part snapping. Aside from the building plane base being a little weird to me, building was rather easy and straight forward. LDD was one of the top contenders after playing with it for a little while.
LeoCAD
The build area is similar to LDD in that it has a plane that parts will automatically align with when you pull them out. The plane will not automatically adjust itself if parts are moved below it, which can be a little annoying (it gets in the way). Dragging parts onto the build area was simple enough, but once they were there I had a hard time adjusting to how to move and orient them. Clicking directly on the part and moving the mouse did not move it around. With the part selected, using the arrow keys did move the part around along the Z and X axis. Little arrows would protrude from the part when you selected it and you could then click on them to manipulate it in any single plane. If you hovered in between where two arrows connected you could grab the part and move it in two planes. The angle of the camera would limit what arrows were available to move the part. Here’s an example of the arrows:
Rotating parts is similar to moving them, there are little arrows, indicating direction, that you can click to rotate the part (see picture above). Depending on the camera orientation it can be difficult to get the correct rotation because it can jump past the desired position.
Selecting parts is pretty easy, you can left-click and drag a box around the parts you want to select and/or Ctrl+Left-click to select what you want. You also have the following options from the Edit menu: Select All, Select None, Select Invert and Select by Name….
Creating a group from selected parts is easy too. Ctrl+g will bring up a dialog to name the group and then it will create the group. Not sure where or why it saves the group name or what it does with it, but it creates a group and the parts will now stay together.
Just like LDCad, LeoCAD lets you split the view into multiple windows and then configure them for different camera positions. You can split horizontally or vertically. Once split you can easily drag the “split bars” to re-size the views. This can be a really useful feature. I didn’t see any way to quickly toggle between the split view(s) and the single, main view. Not sure what the limit on the number of split views is, but it looks like it should be able to accommodate some crazy configurations as well. 🙂
Ctrl+z will undo actions and Ctrl+y will redo actions.
Ctrl+c and Ctrl+v worked like a charm for copying and pasting selected parts.
Moving the camera was different and a little foreign to me:
- ALT+Left-Click rotates the camera around
- You can select Pan from the tool bar to pan the camera around (couldn’t find a shortcut for it)
- Mouse wheel zooms in and out
LeoCAD has a Find option that appears to be related to finding parts in the build area related to your model. However, it didn’t seem to work correctly. When I specified a specific part to find (checked the box next to that option) it did not find it even though it was in the build area. Maybe I was doing something wrong…???
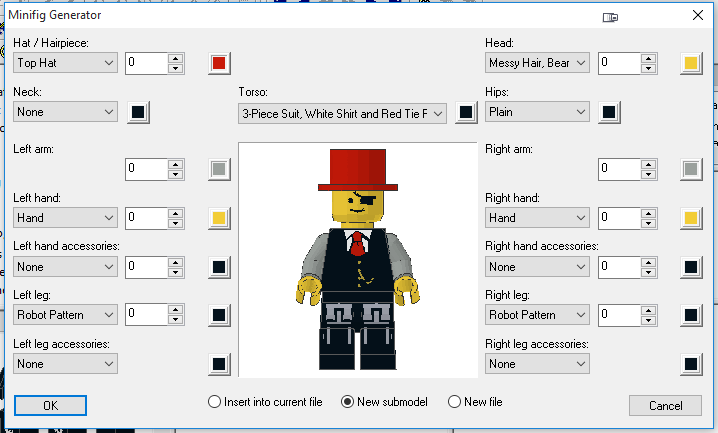
LeoCAD also has a pretty cool Minifig Wizard (Piece > Minifig Wizard…). You can quickly build minifigs until you’re heart’s content. I thought that was pretty cool, there are tons of options to customize a minifig however you want:
Summary: Program has potential, but the interaction with parts and the interface were not appealing to me. The Minifig Wizard might seal the deal if you do a lot of building with them.
MLCad
MLCad’s build area is different than all the other programs in that it has 4 views by default: top, front, left and 3D. You can easily adjust the size of the views as well as the view angle (e.g. top, bottom, left, right, front, back or 3D), but I didn’t see a way to add or remove views. Once you drag a part out to any 2D view you can then drag it around using the mouse. There doesn’t seem to be much you can do with the 3D view other than rotate it around to view the model. There is no part snapping, so having all of the different views helps align the parts correctly.
Rotating parts is pretty straight forward and was accomplished by selecting a part and then clicking the appropriate rotate button in the tool bar until the part was in the correct position. You can choose to rotate clockwise or counter-clockwise around any axis. The tool bar has a lot of useful functions, with pretty self-explanatory images, to quickly help you figure out how to do things. Keyboard shortcuts for more of the toolbar buttons would be a welcome change (maybe I missed them…???).
Selecting parts is easy, you can just left-click and drag a box around the parts you want to select and/or Ctrl+Left-click to select what you want. You can also Select All, Same Type and Same Color by using Edit > Select.
Creating a group from selected parts is easy too. Ctrl+g will bring up a dialog to name the group and then it will create the group. Not sure where or why it saved the group name or what it did with it, but it created a group and the parts will now stay together.
Ctrl+z will undo actions but there didn’t seem to be a way to redo actions.
Ctrl+c and Ctrl+v worked like a charm for copying and pasting selected parts.
Camera control:
- Ctrl+Shift pans the 2D view
- Left-Click rotates the 3D view
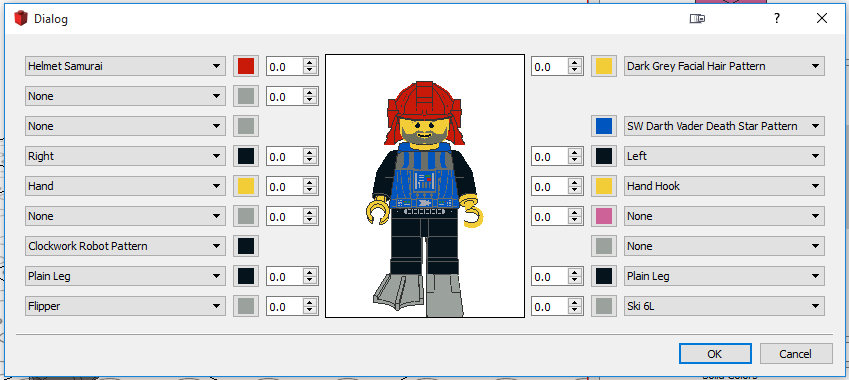
Like LeoCAD, MLCad has a handy little Minifig Generator with lots of options to quickly and easily create minifigs:
Summary: All-in-all, building something wasn’t very difficult, it’s just that lining up parts, when other programs have part snapping, requires more time and effort to build something.
MOC Builder
MOC Builder’s build area is a lot like LDD, JBrickBuilder and LeoCAD, in that it also has a plane that parts will automatically align with when you pull them out. The plane will not automatically adjust itself if parts are moved below it, which can be a little annoying.
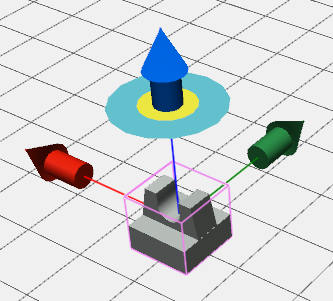
Moving parts is easy, just left-click and drag. Sometimes left-clicking on an un-selected part, and sometimes right-clicking on a selected part (didn’t quite figure that out), would bring up some arrows that you can use to move and rotate the part.
Selecting multiple parts is really easy, and sometimes annoying. By default (not sure you can change it) just left-clicking on multiple parts selects them. In other words, if you simply left-click on a part and then left-click on another part they will both be selected. This bit me a bunch of times because I would expect that clicking on the second part would deselect the first, which is what happens with most of the other programs. I would then do something to the second part and it would affect both parts. Ctrl+z, click off the parts, to deselect all, click back on just the part I want to manipulate and re-do what I had just done…frustrating. You can also just left-click and drag to select multiple parts. I didn’t see any other options for selecting parts.
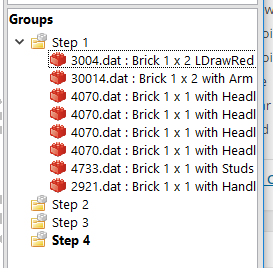
As far a groups go, I couldn’t really figure it out. There is a window on the left that has “Steps”, and if you right-click you can create a new Group. However, it would show up as the next Step number and not a group, which isn’t what I expected. Same thing happened from “Edit > Group > Add A New Group”. Groups appear to be associated with build steps, and I’m not quite sure how to create groups like I did with the other programs:
Part snapping works OK. Sometimes I had problems when pieces were at weird angles or depending on the view and part orientations. I would have to try multiple times just to get parts to snap and it could be frustrating.
There didn’t seem to be any way to create multiple views or go to any kind of 2D view.
Ctrl+z will undo actions and Ctrl+y will redo actions.
Ctrl+c and Ctrl+v worked like a charm for copying and pasting selected parts.
Moving the camera around was pretty straight forward:
- Right-Click and move rotates the camera around
- Shift+Right-Click and move pans the camera around
- Mouse wheel zooms in and out
I did stumble upon the option to Find and/or Replace parts in your model. This could be really useful.
Summary: All in all a pretty slick and easy builder with decent part snapping.
SR 3D Builder
NOTE: I could not get SR 3D Builder to run on Windows 10 without running the compatibility troubleshooter and setting the compatibility mode to Windows 8. Same thing for Windows 7, I had to run it in compatibility mode for Windows XP SP3 to get it to run on Windows 7. Even then it would crash and didn’t always seem to work correctly. So, with that said, some of the weirdness I experienced could have been due to it not running correctly on Windows 10 or Windows 7.
Initially I couldn’t quite figure out how to work with parts and I had to consult the manual to figure it out. Once I figured it out it was pretty straight forward. Click on a part to drag it around the X and Z axis, and use the mouse wheel to move it up/down the Y-axis (that was a nice touch). To rotate the part, click on one of the D-Caddy arrows and it will rotate the part. Here’s what the D-Caddy looks like:
At first I didn’t realize that to get the D-Caddy to stay you had to press Ctrl and then left-click the part. Once you do that the D-Caddy will remain and you can use it to rotate the part. What wasn’t apparent was that if you press Ctrl or Shift while clicking one of the arrows you can move in smaller rotational steps. What I couldn’t figure out was that if I over rotated the part I couldn’t go back, I could only continue to rotate in the initial direction. Ctrl+z would undo the rotation and the last action. I then had to press Ctrl+y again to get it back to where it was before I started to rotate the part and then rotate it again. For whatever reason Ctrl+z would undo my current rotation action, plus the last action.
One thing that frustrated me was that if you have a part selected and then try to add a new part it will replace the current, selected part. Once a part is selected you don’t actually need to click on it to move it, clicking anywhere on the build area will actually move the part. Sometimes, with the part selected, I would move the mouse and it would jump to a different location. I didn’t click or anything, and the part would just move, it was a little annoying and I’m not sure why it did that.
Part snapping worked pretty well and made it easy to attach parts and build models. Sometimes you’d have to use the mouse wheel to adjust the Y-axis to get parts to snap.
Selecting multiple parts is accomplished by using Ctrl+Left-click to select all the parts you want, which can be tedious. You cannot right-click and drag the mouse over multiple parts to select them. There might be a way to do this, but I couldn’t figure it out. You can right-click and get the following select options: Brick, Group, Block, Connected Parts.
I wasn’t able to figure out how to group parts in my initial tests. After fiddling around with it later I figured out that if you press Ctrl+g, after selecting the parts you want to group, the Toolbox switches to the Groups tab. From that tab you can then right-click and choose “New Child” to create a new group. I didn’t realize the right-click option was there when I first tried pressing Ctrl+g to create a group. The options (buttons) that are available hint at groups but don’t allow you to create a group. Not to difficult to do once I figured it out.
Ctrl+z will undo and Ctrl+y will re-do actions.
Ctrl+c and Ctrl+v worked like a charm for copying and pasting selected parts.
Camera movement was as follows:
- Left-click the build area to rotate the camera
- Press both mouse buttons, or the center mouse button, to pan (was tricky to figure out)
- Ctrl+mouse wheel to zoom in and out
Summary: Frustrating part management that didn’t always seem to work the same. I really wanted to like this program, but I was having a hard time figuring out how to do the basics. I’m not sure if any of the issues I had were due to OS compatibility issues.
And the winner for manipulating parts in the build area is…
This was a tough one, there were several programs that made it pretty easy to add and manipulate parts right out of the gate. Initially I liked LDD, it was simple. However, after spending time with the other programs, LDCad stood out to me and became my favorite. It took a little extra effort to figure out how to more effectively use the LDCad interface and shortcuts, but was well worth it. Being able to setup multiple views and quickly toggle between 3D and 2D views was also a big plus for LDCad.
Winner for manipulating parts in the build area: LDCad
[nextpage title=”Changing Part Colors”]
I didn’t think much about changing colors until I actually tried to do it. There were some unexpected results, so I figured I’d share so you don’t have to go through the same troubles. 🙂
JBrickBuilder
JBrickBuilder has a pretty straight forward way of changing colors. Click the “Change brick color” button, select the color you want and then start clicking on parts to change the color. To exit color change mode, just press ESC.
You can also select a group of parts, choose the color you want and then click the “Change brick color” button and it will change the color of all the parts you have selected.
As you use colors, it will maintain a history of them on the right side so that you can easily go back to frequently used colors. This list appears to reset every time you run the program. There is no way to favorite a color, just the frequently used list.
Summary: Fairly simple and straightforward color management.
LDCad
LDCad’s color changing wasn’t as straight forward as I thought it would be. I figured that if I selected a part and then chose a new color it would change the color, that wasn’t the case. Whether or not you have a single part, or multiple parts selected, you actually have to click the current, selected color from the color bar to apply that color. Nothing really bad, just didn’t expect that. It makes sense, and it also prevents accidentally changing color.
One other thing that is different, and really nice, about LDCad’s color management is that it has a color bin that functions similar to the part bin. The color bin has 6 tabs that allow you to set specific colors on each tab and quickly switch between them. There’s also the ability to set favorite colors (and keep them on one tab) as well as keeping a color history, which can be configured on one tab (you can choose Today, Week, Month or All for the color history):
Summary: LDCad’s color management system is pretty powerful and makes it quick and easy to manage colors.
Note: The new 1.5 Beta 1 version allows you to have multiple color bin windows, docked or floating, so you can customize all you want!
Lego Digital Designer (LDD)
LDD “paints” parts. You click on the “Paint tool” from the tool bar and then you can select the part you want to change color. Once you click the part you can then choose the color from a list of colored parts.
One thing that doesn’t appear possible, even with groups, is to change the color of more than one part at a time. This could really be a pain if you had a lot of parts that you wanted to change or if you wanted to experiment with different color schemes for your model.
There is no favorite or recent color list to choose from that I could find.
Summary: Fairly simple to change colors, but inability to change the color for multiple parts at once could make for a lot of extra work when changing colors.
LeoCAD
LeoCAD “paints” parts similar to LDD. You have to click on the “Paint” tool from the tool bar and then you select the part you want to change color. The part will change color based on the color you have selected from the color palette.
Like LDD, there’s no way, that I could find, to change the color of multiple parts at once. Again, this could be really annoying and time consuming if you have lots of parts you want to change color, or if you are experimenting with different color schemes for your model.
There was no favorite or recent color list to choose from that I saw.
Summary: Fairly simple to change colors, but limited by it’s ability to only change the color of one part at a time.
MLCad
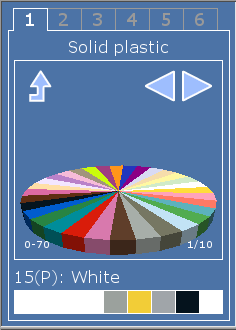
MLCad, color changing made easy. Select your part, or parts, and then click the color from the color bar that you want them to be. Plain and simple.
There was no favorite or recent color list to choose from that I saw.
Summary: Simple and straightforward color management.
MOC Builder
MOC Builder, color changing made easy. Select your part, or parts, and then click the color from the color bar that you want them to be. Plain and simple.
There was no favorite or recent color list to choose from that I saw.
Summary: Simple and straightforward color management.
Note: Yes, this is exactly the same as MLCad’s evaluation…that’s because they function exactly the same way. 🙂
SR 3D Builder
SR 3D Builder’s color management was pretty straight forward as well, select the part or parts that you want and then click the color you want them to be. If you have multiple parts selected it will pop up a warning asking you to confirm that you want to change the color for multiple parts. Not sure I like that or not.
There was no favorite or recent color list to choose from that I saw.
Summary: Fairly simple and straightforward color management.
And the winner for changing part colors is…
There wasn’t much difference in how each program handled color management, aside from not being able to change the color of more than one part. What ended up being the deciding factor was what a program did to differentiate itself from the others and make it easier to color your parts. LDCad’s part bin concept (and the ability to have more than one in the latest beta version), along with favorites and a history sealed it’s victory for me.
Winner for changing part colors: LDCad
[nextpage title=”The User Interface/GUI”]
JBrickBuilder
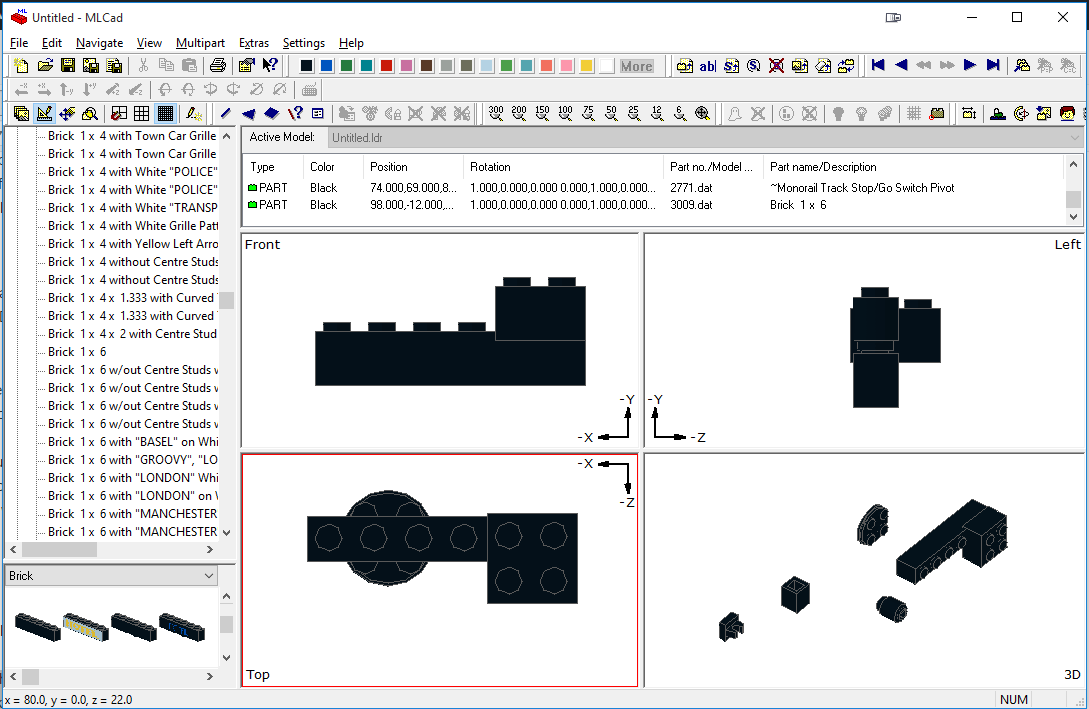
JBrickBuilder’s GUI is pretty well laid out and visually appealing. There’s plenty of room in the center to work on your model. Hovering over the icons lets you know what they do and there aren’t very many options or additional menus. Models don’t look as nice though, as you can see in the screenshot below. It takes longer for JBrickBuilder to load models than the other programs.
You can definitely tell this is a Java app when you go to open a file (not that that’s a bad thing :)), here’s a screenshot of that:

I didn’t like that it would scroll files sideways, I’m used to them scrolling up and down, so this took some getting used to.
LDCad
LDCad’s GUI is the most unique of them all. Here’s what the developer has to say about it:
When you first start / see the main LDCad GUI / interface you probably notice it’s quite different from most modern CAD programs. There are multiple personal and technical reasons, I won’t go into here, for this though. Anyhow don’t let the ‘oldschool’ look fool you, just take the time to get used to it and you might just love it.
What I like about it is that parts and colors are really easy to access and there’s plenty of room to work. I liked the blue background, it was pretty easy on the eyes and parts were pretty easy to pick out.
One thing that I thought could be improved were the icons. You can customize those if they really bother you though. Also, when you hover over the icons, you don’t get a little pop-up to tell you what they do, you have to look down at the bottom bar to see what they do (eyes have to travel a lot, especially if you have a big screen). I got used to it, but it’s not as efficient as having a little pop-up (I think those might be in the works though).
There are lots of options and things you can customize, however, the menus can take a little getting used to and it can be hard to find settings. Here’s an example of one:
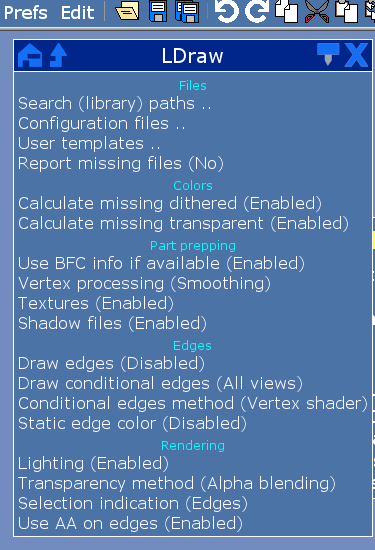
You can actually pin the menu if you want, and you can even navigate up to the root of the entire menu tree by clicking the little house (home) icon. Also, clicking the little up arrow takes you up/back. It was a little different to get used to, but I think I like it better than having a bunch of slide out menus.
Models are rendered really well and look great. AA is enabled in the screenshot above and it makes a little difference in the visual quality of the model.
Lego Digital Designer (LDD)
LDD’s GUI is probably the simplest of them all:

There aren’t many options to choose from, just what you need to build. Hovering over the icons on the top will tell you what they are, and selecting one sometimes presents more options (just below them). To some extent, I think some of the icons could have been a little smaller to make a little more room for building. Not that the build area is small. You can also hide the part menu to give you an even bigger build area (but then how do you get to the parts? :)).
Don’t forget to check out the icons at the bottom of the part bin, they can quickly close all the categories, or filter by a specific color and cut down on all the clutter.
Models are rendered really well and look great.
LeoCAD
LeoCAD’s GUI puts the tools you’ll probably use most front and center. It’s a pretty clean look and I like the icons.
There are quite a few more options that you can get to by going through the other menus.
Models look OK.
MLCad
MLCad’s GUI looks a little dated to me. When I first opened it up the tool bars were all spread out and there was a lot of unused space. You can re-arrange them to take up a lot less space, and even remove the ones you don’t want. However, it does a pretty good job of putting the stuff you use most often front and center. And, although the icons look a little dated, they do a pretty good job of conveying what each one does. If ever in doubt, you can hover over one and it will tell you what it does.
The part bin works pretty well, however, having the view split 4-ways makes building a little cramped. I didn’t do a lot of building in MLCad, but I can see that if you were working on larger models it might be hard to see everything, even with being able to adjust the different views. You can drag the center all the way to a corner to make one view take up the entire build area, but you kind of need them all to correctly line up parts since they don’t automatically snap into place.
Models don’t look bad, but they don’t look great either.
MOC Builder
MOC Builder’s GUI was 2’d to LDD’s in simplicity.
Even though there are additional menus, the options are pretty sparse.
The icons are nice and descriptive, probably my favorite out of the bunch. They could probably be a little smaller to free up a little more real estate for building. There aren’t very many icons because most of what needs to be done can be done with the mouse or through visual queues when you select parts.
You can re-size the areas to the left and right of the build area, but I didn’t see a way to completely hide them (other than dragging the inside edge all the way to the outside edge). By default, this makes the build area feel a little cramped.
Models look really good, probably the best out of all of the programs I looked at.
SR 3D Builder
SR 3D Builder’s GUI was pretty standard. The icons were OK, but a little small. It was a little hard to tell what some of them actually did without hovering over them to find out.
A nice touch is that the Toolbox is detached from the main window and you can put it anywhere you want and re-size it. So, if you have multiple monitors you can put the Toolbox on one and have a nice big build space on the other.
Models look really good.
And the winner is…
Drum roll…there isn’t one. Even thought I don’t go into thorough detail about each one I think you can see that there are good things about all of them. Mostly, I included this section to give others an idea of what each one looks like without having to install the program. So, there you have it. Which GUI do you prefer?
[nextpage title=”Program Features”]
This page is mostly just for reference, it shows the features that I was able to find on each program’s website or elsewhere on the Internet.
JBrickBuilder
Features:
- Simple building, like LEGO® Digital Designer™
- Useful for small-to-medium models (up to 2000 parts with old low-profile PC, over 3500 parts with newer PC)
- In Java, fast and cross platform
- Requires OpenGL, but can use entry level video card.
- Use connection “snap” for easy building
- Uses standard LDraw library
- Update checks and notifications for program and connection database
- Can load DAT, LDR, MPD and some other LDraw-compliant file formats (LCD, L3B, …)
- Can save in LDR and export to MPD, including all custom blocks and unofficial parts
- Support for flexible parts (experimental)
- Support for building steps and player (experimental)
Program is in beta, some functions are planned.
LDCad
Features for the latest, stable LDCad version (1.4b):
- Windows and Linux support.
- Multi-threaded (background) loading of parts.
- Fast detailed real-time 3D rendering.
- Basic part snapping on growing collection of (official) parts.
- Integrated portable flexible parts support (springs, hoses, bands).
- Script based animation.
- Full MPD Support.
- Part grouping.
- Part ghosting.
- Nested editing.
- Relative grids.
- Multiple file editing (open as many files you like).
- Instruction stepping support.
- Full undo/redo.
- Copy/paste from to other LDraw software.
- Highly customizable part and color bins.
- Growing collection of example models.
Features for the latest beta LDCad version (1.5 Beta 1):
- Detachable color and part bin windows, of which you can have multiple instances or none at all.
- Extensive (optional) LDraw source window, with full nested editing support and a growing selection of line type property editing dialogs.
- LDraw file reloading and external changes detection, and you can finally close files now.
- Library part (shadow) editing, mostly intended for myself in order to add part snapping info so it is disabled by default and far from a full LDraw part editing solution.
- Compressed (e.g. complete.zip) library support.
- Single instance protection.
- Loads of minor improvements etc., some of which are:
- Better scrollbar handling
- Bin window(s) can be used at a smaller width.
- Part bin windows can render vertical or horizontal orientated
- And many more tweaks and adjustments etc.
- I also added almost 600 new part snapping files to the default shadow library including info for doors, windows, windscreens, fences, bars, antenna’s, plane parts, boat parts, minifig hats/hair and minifig accessories. Do note some (especially the doors and windows) need some additional work as I’m not sure how they behave/fit in real life any help on that is welcome.
LEGO Digital Designer (LDD)
Features (from Wikipedia):
The program features a palette of bricks and parts in different colors, that can be used to build any model imaginable, but only a subset of the bricks made by LEGO are available for use in regular mode, but the more comprehensive LDD Extended mode allows any brick to be put in any color, but these were not available through the Design byMe service. There is also a mode for viewing, in which screenshots can be taken and the model can be “exploded”. The third mode is where the building instructions are automatically generated, and can be saved as a .html file.
LeoCAD
LeoCAD is a CAD program for creating virtual LEGO models. It has an easy to use interface and currently includes over 6000 different pieces created by the LDraw community.
It supports basic animation (via keyframing) and can export to 3DStudioMax, POV-Ray, and Alias Wavefront.
It has a cool little Minifig Wizard.
MLCad
Features:
MLCad (Mike’s Lego CAD) is a powerful CAD system specifically designed to create building instructions as known from Lego, for your own Lego models and creations. MLCad reads and writes LDraw (a program of James Jessiman) compatible files but in an extensive window based environment. The program helps to create building instructions, which show step by step how to build a model.
The main features of this program are:
- Easy to use
- What you see is what you get
- Full drag and drop support for adding, copying and moving Lego parts
- Print your models and/or generate part lists
- Create pictures of the steps for use in the www.
- Create pseudo models from fractal landscapes or pictures
- Minifig Generator
- and much more
MOC Builder
Features:
- Drag-and-drop building
- Building with Connectivity
- Undo, Redo, Cut, Copy and Paste
- Loads both LDraw and LDD (Lego Digital Designer) models
- Search parts by name and description either from LDraw library or BrickLink Catalog
- Part Browser with customizable category
- Supports all LDraw colors (as of 10/30/2014)
- Find and replace (with color) parts within a working Set
- Step browsing for building instructions
- Automatic grouping
- Overlap Check
- Import a set as a model from local file system
- Import a set from the Set Inventory of BrickLink
- Export parts to BrickLink Wanted List
- Calculate price of model based on BrickLink market price of the parts
- +Connectivity Editor
MOC Builder is an open source, free software.
SR 3D Builder
Features:
- Looking at some video worths more than 1000 words
- NEW Minifig / Pose editor to create and manipulate Minifig in your models
- Support for PowerFunction and Mindstorm electric cables
Improved flex part management - Support for Piston – Rod mechanism
Support for Linear Actuators and Shock Absorbers - Animation Console to easily create and animate your technic models
- Towball, HINGES and GEARS SUPPORT! Take a look to the Gallery to see what I mean
- Connection Solver for quick connecting hinges and rotating parts
Support for RACKS and steering - Support for ANIMATED FLEXYBLE PARTS
- Belt Generator with real connections
- Now with GROUP management
- New exclusive MirrorBuilding features for quick build of symmetric models. MUST TRY !!
- Enhanced instructions editor to easily modify the order in which bricks are loaded in your model and/or take photos while building
- Complex gear driven hinges support (quadrilaters deformation and steering)
- Great fully 3D building envinronment with reflection and transparencies
- You will see your model during loading time and can pause for instruction steps
- You can modify and save models (lDraw/MLCad .dat compatible format)
- Fast selecting/moving/adding/removing you’ll never see in MLCad
- Copy/Rotation/Deletetion/Color change of single or multiple brick. Undo/Redo functionality
- Real connections detection, not always the same near brick positioning
- Brick selection by Block (means that solid connected bricks can be selected at once)
- Grid positioning to speed up positioning of pieces
- Automatic and precise positioning and orientering of most bricks according to connection detection
- Automatic detection of rotation axles
- You can easily load model from other known programs: it supports the following formats:
- .dat files
- .ldr files
- .mpd files (only a few metacommand are currently supported)
[nextpage title=”Final Verdict”]
Wow, that took a lot more time than I had anticipated! I apologize if some of the sections appear rushed or if info was left out. Truth is, after playing around with the applications a bit I had settled on the following as the top two contenders:
- Lego Digital Designer (LDD)
- LDCad
I spent most of my time with them and then went back and played with the others to try and include a little more info besides, “I didn’t really like this program”. Hopefully you find some useful info in what has been written.
LDD quickly moved to the top of my list because it was pretty easy to use and the part snapping was really good. However, I didn’t really like the part search, grouping or color management as well as that of LDCad. Not a huge deal breaker, but the latest version is almost two years old and who knows what is planned for it.
LDCad’s controls were a little more difficult to adjust to and learn at first. However, after reading though the documentation I quickly started to pick things up and really started to like it. The part and color bins were great and made building easier and quicker. Being able to have all kinds of different split views and quickly toggle between 3D and 2D views was really helpful. Some might not like the GUI, but I think that’s one thing that really makes it stand out. Roland Melkert, the developer of LDCad, is actively working on this program and constantly adding additional features.
You can customize the GUI of LDCad by modifying one of the config files and creating your own custom icons, but I haven’t messed with that yet (info here). One of my favorite features in the new beta build is the ability to edit part snapping data from within the application. I also love being able to have multiple color and part bins in the beta version as well.
So, of the top two, which did I choose?
If you haven’t figured it out, the overall winner and grand champion, by a landslide, is LDCad!
To be fair to the others, here’s a quick summary on why I didn’t choose them:
- JBrickBuilder – The big turn off for me was the constant clicking to add parts and having to use Cut and Paste to move them. Not understanding how to move parts I left the program because I didn’t find it very usable. After posting on the LDraw forums I got an answer about moving parts, but it’s not a very elegant, or intuitive solution. It works, and one could probably get used to it, but I passed.
- LeoCAD – I wasn’t too fond of how you moved the camera around and how parts were manipulated. I also didn’t like having to switch between tools (move, select, color, etc.) to do things, that was a bit annoying. There wasn’t any part snapping either, and that just meant it would take more time to build. Having a proprietary parts library, even though it’s based on LDraw, was another minus in my opinion. On the plus side, this program is fairly current compared to some of the others. It was also the only one with the ability to export to some popular 3D rendering programs, which may be really appealing to some. It also has a pretty cool Minifig Wizard, check it out if you use lots of minifigs in your models.
- MLCad – The LDraw standard for a long time, a workhorse of a program, and useful for a lot of things (from what I understand, especially more advanced features), but it is a little dated and it didn’t really appeal to me. No part snapping, no editable 3D view (at least I couldn’t edit it), and not having a “full screen” view (maybe there is one), wasn’t appealing to me. Other things were not bad though. I didn’t really want something that hadn’t been updated in awhile when there was newer stuff available (however, it may be just fine in it’s current state and not really need any updates). I may go back to this if I need some of its features, but that might involve importing models that I build in another program. It also has a cool Minifig Generator if you like to build minifigs.
- MOC Builder – Loved the simplicity of it, but that was also part of it’s downfall for me. It just didn’t seem as feature rich as the others. It’s relatively new though, so that could change in the future.
- SR 3D Builder – I really had high hopes for this application going into this. First, I couldn’t get it to run and then I had problems using it. It just started to go downhill from there. Sadly, I found out the creator of the program passed away last fall and there didn’t appear to be much hope of the program continuing. That’s a shame, because from what little I did see Sergio Reano was well loved by the community and had created a truly amazing piece of software. Sounds like he had done some pretty innovative things and I would have loved to see what he could have done. Had there been a possible future for this program, and had it not been buggy, I might have spent more time with it.
Final thoughts…
Read the documentation and watch whatever videos you can. Try more than one out, you won’t know what you’re missing and/or don’t like unless you do and you might even find out about features that you would otherwise have missed. You might end up using more than one. Also, check out the different forums to get help or just see what other people are saying or need help with. You’ll get the most out of the program(s) if you do.
LDraw forums or the Eurobrick forums are a great place to post questions if you can’t figure something out, or are just great to browse through and see what others have said or are working on. There are other great sites out there, but these are two that have come up frequently in my searches. Enjoy!
There you have it. Hopefully you enjoyed some of the read and found something useful. Good luck in your quest to find the best program for you!
Leave a Reply
You must be logged in to post a comment.